CLASSIC POPOVERS

Popovers

Ingredients:

12 Servings

  • 3 large eggs
  • 1  1/2 cup milk
  • 1  1/2 cup all-purpose flour
  • 1/2 tsp. Kosher salt

Notes:

* If you want the popovers more puffy, you can add 1/2  teaspoon of baking powder for this recipe, but I prefer to stick with the original recipe.

* You can add a tiny bit of cheese, bacon bits or onions to get extra aromas and flavours.

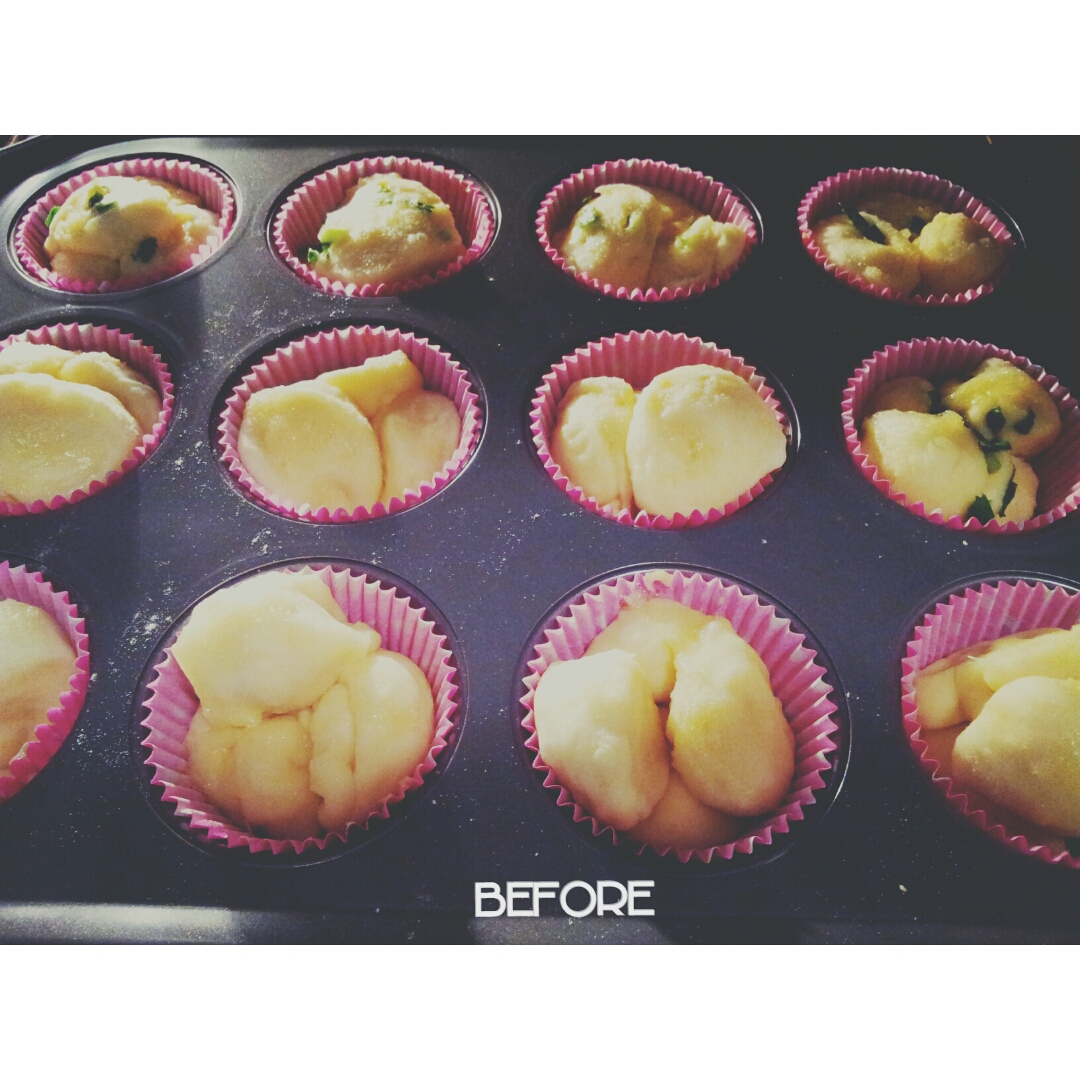
* I add a bit of cheese on top so my popovers have holes in the middle as you can see in the picture, but if you don’t add anything on top of each popover before baking, they all will come out perfectly.

Directions:

Whisk 3 eggs in a mixing bowl. Then add milk, flour and Kosher salt in and continue to whisk until all ingredients blend well together.

Apply thin layer of unsalted butter or spray the muffin tray with nonstick spray  (I don’t have popover pans so I use a muffin tray)

Fill the batter only half way or 2/3 of each muffin cup , leave some space so the popovers will have plenty of room to expand.

Put the muffin tray in an oven, DO NOT PRE-HEAT the oven before putting the muffin tray in.

Bake at 450 F for 25 minutes and DO NOT OPEN the oven during baking time to make sure all popovers rise at maximum level.

Carefully take the muffin tray out and remove Popovers to the cooling racks. Enjoy those Popovers with pâté, mayo, butter or jam.

Outside was snowing, having a hot and fresh Popover on hands is the best feeling.

A classic popovers is a delightful combination of eggs, milk, flour, salt, and just a touch of butter. They are so good, but they are even better when coming out of the oven fresh, hot, and golden brown. When your popovers are puffy and crispy on the outside, yet airy on the inside then you know that you have succeed in making them. Popovers are perfect addition to breakfast, lunch, dinner, or even between snacks because it is so light. Now, go ahead and make some extra Popovers to treat families and friends, they will fall in love and thank you for that.
Happy cooking! Happy blogging!

SALMON SPRING ROLLS

Please follow chopstickspoon.wordpress.com to get new recipes every week

I love spring rolls and there is no words could describe how much of my love for Vietnamese cuisine. My guilty pleasure would be deep-fried pork or seafood spring rolls but recently I try to come up with some different ways to cook with nutritious, low-carb and healthy foods for my family, so I come up with an idea to play around with salmon and rice papers – Baked Salmon Spring Rolls

Ingredients:

  • 12 small salmon slices
  • 12 Rice papers (8 inches banh trang)
  • Salt
  • Pepper
  • Dry Parsley flakes
  • Oil
  • Baking tray

Directions:

Placing salmon on a cutting board nicely. Sprinkle a bit of salt, pepper and parsley.

Soaking rice paper under warm tap water (one by one).

Putting the wet rice paper on a clean, smooth and dry surface before working with it. Using chopsticks to place a salmon slice at about one-third diagonal of the square rice paper. Carefully folding all edges together to make all salmon spring rolls look like this:

Wrap salmon in a wet rice paper

Spraying oil on a baking tray and then arranging all salmon spring rolls nicely (make sure to give some space between each roll to avoid rice papers sticking to each other). Lightly spraying another oil coat on top of those salmon spring rolls before baking at  350 degree.

After 20 minutes of baking, use chopsticks to turn all spring rolls over to bake the other side evenly for 20 more minutes.

When salmon spring rolls are done, carefully take them out, place on a nice serving plate and enjoy with family or friends.


The spring rolls are crispy outside and tender inside, plus salmon is a great ingredient to provide Omega-3 that means eating salmon makes you smarter and happier. I hope you enjoy this recipe and try it out! If you liked this recipe, please take a moment to share it on Pinterest or Facebook page.

* You can serve Salmon spring rolls with Vietnamese dipping fish sauce too. It adds more aroma and flavour to the salmon.

HOW TO MAKE $1 INSTANT NOODLES TASTY

Instant noodle is well-known as a quick meal but you can make it tastier with some simple ingredients (It is also a great way to clean up leftover foods in your fridge)

  1. Add chicken/ pork/ beef broth (Or even creamy curry broth would be fine too)
  2. Add left-over meat (pull pork, shredded beef, butter chicken, etc.) 
  3. Add cheese (make sure let it melt by pouring extra broth on top of cheese) 
  4. Add sea weed and roast sesame seeds (If you are not a fan of sea-weed, you can skip this)
  5. Add vegetables and herbs (water cress, spinach, bean sprouts, basils, green onions, fried shallots, etc.) 
  6. Add a sunny-side-up fried egg
  7. Add Siracha for hot-spicy taste

… And now you have your own version of an epical tasty-yummy noodle bowl soup, enjoy!!

MINI BRIOCHE BREAD IN CUPS

This recipe was adapted by Artisanbreadinfive. I have to admit that I haven’t made any breads before since it takes too much time to knead dough; for saving time, I used to buy breads at Costco then froze in a freezer and took them out to use whenever I need to. However, the fresh-baked bread is always drive me crazy that make me want to make my own breads. Fortunately, I’ve found the Brioche dough recipe (here) and decided to give a try.

Mini Brioche Breads in Muffin Cups

I followed instructions, mixed the dough and stored in the fridge for 1 day before using it. It was such a cool feeling when touching the soft, moist and not too buttery texture of dough. I made long dough sticks and cut into small cubes before placing into 12 muffin cups, then I covered and let the dough rest for 1 hour. (you will see it raise almost double its size)

Mini brioche breads (before)

Then I placed the muffin tray in the oven that I pre-heated at 450 degree. Taking the muffin tray out, waiting until those mini breads (in muffin cups) cool down a bit and then make a BIG BITE…yumm…Those mini breads are not only cute but they are tasty too – taste like sweet breads but not too sweet and easy to eat with anything such as pâté, butter, cinnamon sugar, etc.

Mini Brioche Breads (after baked)
I mix some with chives and other ones with cheese before baking to bring out different flavours

I am so glad to even try out their master recipe and fall in love with the breads. Now I can have fresh-baked breads everyday and don’t have to worry about storing frozen breads in the freezer. You can get their  master recipe at here:

Hope you find it is useful

VIETNAMESE BANANA FLOWER SALAD ( Gỏi Hoa Chuối)

Banana flower is an ingredient commonly used in Vietnamese and Thai cooking and, yes, it comes from growing bananas . It can be eaten raw or steamed, and a great source of vitamins A and C. Raw banana flower has a dry crunchy tacky taste, but when you mix with fish sauce, herbs and cabbage, they all help banana flower taste fresh, juicy and smell great. The banana flower salad recipe can be done in 15-20 minutes; follow me to know how to make it.

Vietnamese Banana Flower Salad

Ingredients:

1 ounces Banana Flower

1 ounces Purple Cabbage

Culantro & Coriander leaves

Vietnamese dipping fish sauce

Banana Flower Salad Ingredients

Directions:

Use mandolin to make banana flower and purple cabbage slices. It will come out about 3-4 inches lengthwise thin strips, looks very nice. If you don’t have mandolin, you can just cut it with knife.

Wash and soak banana flower and cabbage in salted lemon cold water separately for 10 minutes before drain.

Place banana flower and purple cabbage on a serving plate. Garnish with coriander and culantro leaves.

Pour  Vietnamese dipping fish sauce on top and serve as a side dish with fried shrimp chips (optional)

Enjoy!!

RECIPES FOR LUNAR NEW YEAR 2014 – PICKLES WEEK

It’s getting close to Lunar New Year (January 31, 2014), I am extremely over-excited at preparing foods, cleaning up and decorating the house. Lunar New Year festival is the biggest holiday in Vietnam; in fact, it is as big as Chinese New Year and many Southeast Asia countries celebrate their New Year on the same day such as China, Thailand, Singapore, Indonesia, Malaysia, Korea and Japan.
 
Vietnamese people call Lunar New Year is Tet Nguyen Dan, and we celebrate this festival at least three days up to two weeks (depend on family’s financial). Plenty of foods will be cooked and served for families and guests within fun atmosphere and respectful attitude. People bring gifts to visit each other’s house; adults never forget to bless and give out red pocket stuffed with cash to children.
 
Popular Tet dishes include banh chung, a square-shape, sweet rice cake stuffed with mung beans and pork & banh day, a white round shaped, sticky rice with pork. It’s usually eaten with dua mon, a mixture of pickled radishes, peppers, carrots and other vegetables. Favoured snacks are dried watermelon seeds and candied ginger, coconut, pineapple, kumquat, orange and tamarind… I usually prepare different types of pickles firsts since they take longer time to fermented. Pickles are important side dishes to eat along with other Vietnamese dishes, just like burger cannot be without pickles. So let’s make it together!

Vietnamese Pickled Bean Sprout (Dua Gia)

Vietnamese Pickled Bean Sprout (Dua Gia)

Ingredients:

  • 4 ounces fresh Asian bean sprouts
  • 2 ounces sliced thin carrots, 3 inches lengthwise
  • 3 ounces sliced chives, trimmed and cut into 3 inches lengthwise
  • 1 tbsp. salt
  • 1 tbsp. sugar
  • 1 cup water
  • 1/2 cup white vinegar

Directions:

  1. Wash and prepare all vegetable ingredients (carrot, chives and Asian bean sprouts)
  2. In a separate large bowl, pour water then add salt, sugar and vinegar. Mix well
  3. Add all vegetables into the bowl. Leave it for 20 minutes.
  4. After 20 minutes, the part that soak in liquid mixture will get softer. Now, you need to use chopsticks or hands to mix the vegetables up side down, leave it for 20 more minutes.
  5. Transfer everything into a clear jar or container. For fermented vegetable, cover tightly and let stand at room temperature for about 24 hours before put in a fridge.

Vietnamese Pickled Mustard Greens (Dua Chua)

Vietnamese Pickled Mustard Greens (Dua Chua)

Ingredients:

  • 3 lb large head of Asian mustard greens
  • 7 cups water
  • 2 tbsp. salt
  • 4 tbsp. sugar

*Do not add vinegar, let it has natural sweet and sour taste.

Directions:

  1. Break the mustard greens leaves apart and clean thoroughly under running water.
  2. Cut the leaves to desired size, about 1-2 inches pieces. Make sure wash carefully before drain them.
  3. Combine water, salt, and sugar in a pot and bring almost to a boil. Turn off heat and wait until water completely cools. 
  4. Add all the vegetables into an empty jar or container, making sure everything is submerged. Leave your container at room temperature so it can pickle. Taste a piece every 24 hours until it gets sour enough for your taste, then transfer to the fridge.

Stuffed Cucumber Kimchi

Stuffed Cucumber Kimchi

Ingredients:

  • 3 large cucumbers (or 6 in small size)
  • 1 cup sea salt
  • 3 cups hot water
  • 2 tbsp. sugar
  • 1 tbsp. fish sauce
  • 6 tbsp. water
  • 2 tbsp. minced garlic
  • 2 tbsp. minced ginger
  • 1 tbsp. Korean red chilies flakes
  • 2 ounces sliced chives, cut into 1-inch pieces
  • 2 ounces thin slices carrot, use mandolin to slice carrot evenly
  • 1 tbsp. sesame oil

Directions:

  1. Wash and cut cucumber into 3 inches long, then cut quarter it lengthwise (not all the way of cucumber, leave about 1 inch at the bottom)
  2. Soak cucumber with 3 cup hot water and 1 cup of sea salt. Leave it in hot water for 45 minutes. After that, take cucumbers out and soak in cold water to help keeping the crispness (20 minutes) then drain them.
  3. In separate bowl mix minced garlic, minced ginger, salt, sugar, sesame oil, red chillies flakes, fish sauce, carrot sliced and chives all together.Stuff carefully each cucumber with the filling, and try not to break them.
  4. Put all cucumbers in a jar, cover lid and leave in room temperature for at least one day before store in a fridge.

I really hope you enjoy those pickles recipes. Next time I will post banana flower salad recipe, please keep checking my blog for new easy-to-make recipes every week.

Happy Lunar New Year!

Chuc Mung Nam Moi!

BAKED PARSLEY POTATOES – A HEALTHY WAY TO EAT FRIES

Baking parsley potatoes

We all like French fries, but how can we enjoy eating without being afraid of gaining too much weights? I would like to introduce to you a healthy way to eat fries (without frying), it is baked potatoes fries. It has fresh potatoes smell, crunchy texture, and a little kick of spicy butter parsley flavour. The dish is super-easy to make plus it is a great snack to serve family and friends within little time.

Ingredients:

(Serving for two)

  • 2 large potatoes
  • 1 tsp. table salt
  • 1/2 tsp. black pepper
  • 1/4 tsp. cayenne pepper
  • 2 tablespoons olive oil
  • 1/2 tsp. butter (I use unsalted butter, but if you prefer a little salty taste fries, you can go for salted butter)
  • Minced fresh parsley

Baking parsley potatoes_ cut potatoes into thin strips

Directions

Wash, peel skin off and cut potatoes into thin strips.

Turn oven on to 450 degree.

Place a parchment paper over a baking tray. Spray a layer of oil on the parchment paper.

Place potatoes into a bowl, add 1/2 tsp. salt, 1/2 tsp. black pepper, and 1 1/2 tablespoon olive oil. (Give a good massage to potatoes) Mix well all ingredients together.

Arrange nicely all potatoes strips on the parchment paper (do not place over lap because you want to make sure all potatoes got cooked evenly). Let it bake for about 20 minutes.

Baking parsley potatoes_a healthy recipe

After 20 minutes (or when you see potatoes are lightly golden brown), switch to broil and leave it bake for 5 more minutes.

Meanwhile you add minced fresh parsley, 1/2 tsp. salt, 1/4 cayenne pepper, 1/2 tsp. butter and 1/2 tsp. olive oil into a mixing bowl.

Turn oven off and transfer all potatoes into the mixing bowl. Give couples toss to mix all ingredients together and serve right away when it still hot.

Enjoy and happy cooking!

GREEN PAPAYA SALAD

Green Papaya

Happy New Year to everyone!
In year 2014 #chopstickspoon promise to share more easy-to-make recipes from my kitchen to your kitchen including main dishes, side dishes, sweets and drinks. The first recipe of the year is “Green Papaya Salad”. Hope you enjoy it!

Ingredients:

1 Small green papaya

Brown tomatoes (or cherry tomatoes)

Mint/ basil & coriander leaves

Vietnamese dipping fish sauce

Green Papaya Salad_ cut into thin slices

Directions:

Prepare a bowl of cold water, 1 tbsp lemon and 1 tbsp white sugar. Leave it to aside

Peel the papaya skin completely. Cut the papaya in half lengthwise and scrape out the seeds using a spoon. Shred the papaya into thin strands using a shredding tool or mandolin, make sure to get rid of the papaya core.

This is a very important step – Wash and Soak shredded papaya in the cold water bowl you prepare ealier (leave about 5-7 minutes). Repeat this process couple times to keep papaya not turn brown and get rid of the sticky residue. Then use a salad dryer to remove water.

Place papaya and tomatoes wedges into a serving bowl, add coriander and basil/ mint leaves

Pour  dipping fish sauce on top and serve as a side dish with fried shrimp chips (optional)

Enjoy!!

SHRIMP ON SWEET POTATO NEST

Around 80’s people were still poor in Vietnam, my parents got married and had no choice but to lived in a very small house that they shared with others. They tried to save every single Dong (VND Vietnamese currency) to born me. Even though my parents didn’t have a lot of money at that time but they always tried to raise and support me in the best ways they could. I remember I didn’t have many toys, besides one big doll with blue hair and couple sets of cooking toys to play with other neighbour kids. The interesting thing was that my mom let me played with real foods, so we children always had tasty snacks every time gathering to play together. She made all various foods such as deep-fried banana patties, rainbow jelly, sweet and sour bon-bons, caramel sugar candies, hot sugar syrup tofu, coconut sticky rice cakes wrap in banana leaves, and much more including deep-fried shrimp on sweet potatoes nest. I am even still drooling every time think or talk about my yummy childhood foods…hmm, so why not travelling back in time with me to see how they were made!

Ingredients for batter:

1 cup rice flour

2 cups all purposed flour

3 cups water, 1/2 tsp. salt, 1/2 tsp. sugar

2 beaten eggs


Ingredients for other things:

Shrimps, 1/2 tsp. pepper, 1 tsp. minced garlic

2 large sweet potatoes, vegetable oil to deep-fried

Vietnamese dipping fish sauce

 Fried shrimp and sweet potato cakes

Directions:

  1. Combine all ingredients for the batter, mix well until smooth.
  2. Clean shrimps and season with pepper, salt, sugar and minced garlic
  3. Peel sweet potatoes skin, and then shred thinly. Rinse slightly under water. Put all shredded sweet potatoes into the batter mixture
  4. Pour oil into a saucepan, at high heat.
  5. Use a small size of bouillon spoon to scoop the batter, then pour gently into the hot oil. Use Chopsticks/ spoon/ tong to take a shrimp, press slightly on the top of the sweet potato mixture
  6. Deep friend for about 2-3 minutes then flip to the other side, continue frying until golden brown
  7. Serving with lettuce, herbs and dipping fish sauce
Fried Shrimp & Sweet Potatoes
Photo credit to: family.vn

AMBARELLA SALAD

“I was born and grew up in Vietnam, a tropical country with hot weather and source of different delicious fruits including Ambarella. This salad recipe has been passed on to many generations in my family because it is a great side dish for men to eat while drinking beer, a natural medicine for women to lose some weights, and a cheap but nutritious childhood snack for all children. I remember I used to gather with my friends everyday, put all money together to buy bags of variety of fruits such as guava, papaya, pineapple, tamarind, green mango and of course couldn’t miss ambarella, then we brought to school and shared with others. It was nothing fancy, just some simple snacks, but I have never forgotten those sweet memories…  “

Ingredients:

  • 3 Ambarella fruit
  • Dry shrimps
  • Fried onion
  • Mint & Basil
  • Vietnamese dipping fish sauce

 Ambarella salad

Directions:

  • Wash and peel Ambarella’s skin, cut in thin slices
  • Add dry shrimps, fried onion, mints and basil
  • Pour 1/2 cup of Dipping fish sauce and mix well
  • Keep cool in the fridge, serve as side dish